Last.fm – the Blog - Tips and Tricks Music and Web Geekery from East London tag:blog.last.fm,2005:59ab5fd5ebdd7507425a613a80c0101f/tips-and-tricks Textpattern 2014-03-12T05:13:40Z administrator http://blog.last.fm/ Nick Calafato 2014-01-29T13:59:24Z 2014-01-29T14:33:54Z Did Someone Say On Demand? tag:blog.last.fm,2014-01-29:59ab5fd5ebdd7507425a613a80c0101f/a384a00608e8943819d7f8ef77aaf181 We’ve always strived to make Last.fm as relevant to your music life as possible. Whatever you’re listening to and wherever you’re listening to it from – we know about it. There has however been one gap; the inability to play whatever you want by whoever you want directly on Last.fm. This has now changed.

We’ve teamed up with Spotify to bring their entire catalogue, on demand, to the world’s leading music recommendation service. Whether it be your own profile page, artist pages or album pages – if Spotify has it, you can play it and control it on Last.fm via the Spotify playbar at the bottom of the screen. Using your Spotify account (premium or free) you can listen to any track simply by pressing the play button. This will load all tracks on a Last.fm page as a playlist in Spotify.

This new feature brings a depth to Last.fm like never before and gives you a much richer listening experience. The availability of over 20 million tracks at your fingertips allows you to listen to full albums as well as rediscover your scrobbling history – listen to your loved tracks, past charts and more.

This latest collaboration builds on an already successful partnership between the two services, which includes the highly successful Last.fm app on Spotify.

As with any new integration there are of course some known issues, so please bear with us! You can find out about them here and you can leave your feedback in the forums here

We’re hugely excited to bring this new functionality to Last.fm and can’t wait to see what you think.

Enjoy!

]]>
We’ve always strived to make Last.fm as relevant to your music life as possible. Whatever you’re listening to and wherever you’re listening to it from – we know about it. There has however been one gap; the inability to play whatever you want by whoever you want directly on Last.fm. This has now changed.

]]>
Michael Horan 2012-12-19T14:03:22Z 2012-12-19T14:09:32Z Scrobbler for iOS tag:blog.last.fm,2012-12-19:59ab5fd5ebdd7507425a613a80c0101f/fe6e7ff253e21cff2b85071f933bd95e Ten years ago was a boon-time for MP3s. I remember ripping my first CD, thrilled with the prospect of storing my ever-expanding collection on a computer instead of taking up precious space in my cramped apartment. The shelves of CDs started collecting dust, my Discman gave way to MP3 players, iTunes was born and then the iPod allowed me to carry 1,000 songs in my pocket!

Eleven years later, I have transferred my music library between many computers, over dozens of portable devices and now in the ether of a cloud. My digital library has been a constant companion, traveling the world and growing with me. I love my library!

Recent developments in streaming services are making the maintenance of a digital collection obsolete. Seemingly endless libraries are available for monthly rental, and internet radio services like Last.fm offer unlimited personalised streaming. There are so many new ways to listen to music now, that I sometimes forget about my carefully curated digital library.

It is with this in mind that the Scrobbler for iOS was created.

Introducing the Scrobbler for iOS, an iPhone and iPad application that not only natively scrobbles, but gives you several ways to re-discover your digital library.

We’ve long known that scrobbling iPhones has not always been a seamless process, so we wanted to create an application that alleviates this pain. We also wanted to offer our users with something new, so we built playlisting services that get applied to your digital library. For the first time, the algorithms that power Last.fm Radio can now be applied to the libraries you’ve spent years curating.

Every track in your library can be used to discover other, similar tracks. We use the power of machine tags and the knowledge of social tags to help you re-connect with the music you love.

Download the app here and join the group to keep up to date with announcements, forums and help.

]]>
Introducing the Scrobbler for iOS, an iPhone and iPad application that not only natively scrobbles, but gives you several ways to re-discover your digital library.

]]>
mike 2009-12-14T16:57:13Z 2009-12-21T15:56:13Z Launching Xbox, Part 2 - SSD Streaming tag:blog.last.fm,2009-12-11:59ab5fd5ebdd7507425a613a80c0101f/7fc2763a908e81a48aa429292829e51f This is the second in a series of posts from the Last.fm engineering team covering the geekier aspects of our recent Last.fm on Xbox LIVE launch. Part one (“The War Room”) is here.

The music streaming architecture at Last.fm is an area of our infrastructure that has been scaling steadily for some time. The final stage of delivering streams to users fetches the raw mp3 data from a MogileFS distributed file system before passing it through our audio streaming software, which handles the actual audio serving. There are two main considerations with this streaming system: physical disk capacity, and raw IO throughput. The number of random IO operations a storage system can support has a big effect on how many users we can serve from it, so this number (IOPS) is a metric we’re very interested in. The disk capacity of the cluster has effectively ceased being a problem with the capacities available from newer SATA drives, so our biggest concern is having enough IO performance across the cluster to serve all our concurrent users. To put some numbers on this, a single 7200rpm SATA drive can produce enough IOPS to serve around 300 concurrent connections.

We’ve been using MogileFS for years at Last.fm, and it’s served us very well. As our content catalogue has grown, so has our userbase. As we’ve added storage to our streaming cluster, we’ve also been adding IO capacity in step with that, since each disk added into the streaming cluster brings with it more IOPS. From the early days, when our streaming machines were relatively small, we’ve moved up to systems built around the Supermicro SC846 chassis. These provide cost effective high-density storage, packing 24 3.5” SATA drives into 4U, and are ideal for growing our MogileFS pool.

Changing our approach

The arrival of Xbox users on the Last.fm scene pushed us to do some re-thinking on our approach to streaming. For the first time, we needed a way to scale up the IO capacity of our MogileFS cluster independently of the storage capacity. Xbox wasn’t going to bring us any more content, but was going to land a lot of new streaming users on our servers. So, enter SSDs…

Testing our first SSD based systems

We’d been looking at SSDs with interest for some time, as IO bottlenecks are common in any infrastructure dealing with large data volumes. We hadn’t deployed them in any live capacity before though, and this was an ideal opportunity to see whether the reality lived up to the marketing! Having looked at a number of SSD specs and read about many of the problems early adopters had encountered, we felt as though we were in a position to make an informed decision. So, earlier this year, we managed to get hold of some test kit to try out. Our test rig was an 8 core system with 2 X5570 CPUs and 12 Gb RAM (a SunFire X4170).

Into this, we put 2 hard disks for the OS, and 4 Intel X25-E SSDs.

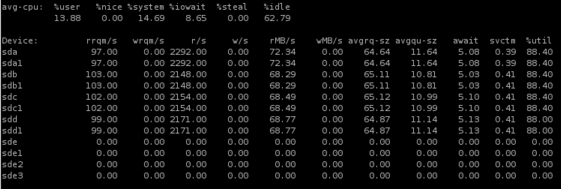
We favoured the Intel SSDs because they’ve had fantastic reviews, and they were officially supported in the X4170. The X25-E drives advertise in excess of 35,000 read IOPS, so we were excited to see what it could do, and in testing, we weren’t disappointed. Each single SSD can support around 7000 concurrent listeners, and the serving capacity of the machine topped out at around 30,000 concurrent connections in it’s tested configuration – here it is half way through a test run (wider image here):

Spot which devices are the SSDs… (wider image here)

At that point its network was saturated, which was causing buffering and connection issues, so with 10GigE cards it might have been possible to push this configuration even higher. We tested both the 32Gb versions (which Sun have explicitly qualified with the X4170), and the 64Gb versions (which they haven’t). We ended up opting for the 64Gb versions, as we needed to be able to get enough content onto the SSDs for us to serve a good number of user requests, otherwise all that IO wasn’t going to do us any good. To get these performance figures, we had to tune the Linux scheduler defaults a bit:-

echo noop > /sys/block/sda/queue/scheduler
echo 32 > /sys/block/sda/queue/read_ahead_kb

This is set for each SSD – by default Linux uses scheduler algorithms that are optimised for hard drives, where each seek carries a penalty, so it’s worth reading extra data in while the drive head is in position. There’s basically zero seek penalty on an SSD, so those assumptions fall down.

Going into production

Once we were happy with our test results, we needed to put the new setup into production. Doing this involved some interesting changes to our systems. We extended MogileFS to understand the concept of “hot” nodes – storage nodes that are treated preferentially when servicing requests for files. We also implemented a “hot class” – when a file is put into this class, MogileFS will replicate it onto our SSD based nodes. This allows us to continually move our most popular content onto SSDs, effectively using them as a faster layer built on top of our main disk based storage pool.

We also needed to change the way MogileFS treats disk load. By default, it looks at the percentage utilisation figure from iostat, and tries to send requests to the most lightly-loaded disk with the requested content. This is another assumption that breaks down when you use SSDs, as they do not suffer from the same performance degradation under load that a hard drive does; a 95% utilised SSD can still respond many times faster than a 10% utilised hard drive. So, we extended the statistics that MogileFS retrieves from iostat to also include the wait time (await) and the service time (svctm) figures, so that we have better information about device performance.

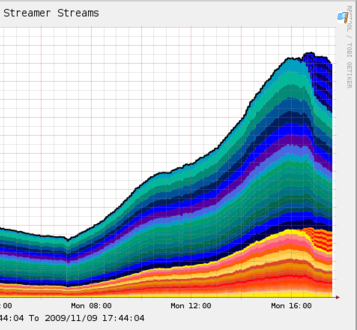
Once those changes had been made, we were ready to go live. We used the same hardware as our final test configuration (SunFire X4170 with Intel X25-E SSDs), and we are now serving over 50% of our streaming from these machines, which have less than 10% of our total storage capacity. The graph below shows when we initially put these machines live.

You can see the SSD machines starting to take up load on the right of the graph – this was with a relatively small amount of initial seed content, so the offload from the main cluster was much smaller than we’ve since seen after filling the SSDs with even more popular tracks.

Conclusions

We all had great fun with this project, and built a new layer into our streaming infrastructure that will make it easy to scale upwards. We’ll be feeding our MogileFS patches back to the community, so that other MogileFS users can make use of them where appropriate and improve them further. Finally, thanks go to all the people who put effort into making this possible – all of crew at Last.HQ, particularly Jonty for all his work on extending MogileFS, and Laurie and Adrian for lots of work testing the streaming setup. Also thanks to Andy Williams and Nick Morgan at Sun Microsystems for getting us an evaluation system and answering lots of questions, and to Gareth Tucker and David Byrne at Intel for their help in getting us the SSDs in time.

]]>
lozzd 2009-12-07T16:38:31Z 2009-12-21T15:56:01Z Launching Xbox, Part 1 - The War Room tag:blog.last.fm,2009-11-24:59ab5fd5ebdd7507425a613a80c0101f/aa1719ab4134d252be2c4f727d45c8e2 As many of you noticed, a few weeks ago we launched Last.fm on Xbox LIVE in the US and UK. It probably goes without saying that this project was a big operation for us, taking up a large part of the team’s time over the last few months. Now that the dust has settled, we thought we’d write a short series of blog posts about how we prepared for the launch and some of the tech changes we made to ensure that it all went smoothly.

0 Hour: Monitoring.

First up, let me introduce myself. My name is Laurie and I’ve been a Sysadmin here at Last.fm for almost two and a half years now. As well as doing the usual sysadmin tasks (turning things off and on again) I also look after our monitoring systems, including a healthy helping of Cacti, a truck of Nagios and a bucket-load of Ganglia. Some say I see mountains in graphs. Others say my graphs are infact whales. But however you look at it, I’m a strong believer in “if it moves, graph it”.

To help with our day-to-day monitoring we use four overhead screens in our operations room, with a frontend for Cacti (CactiView) and Nagios (Naglite2) that I put together. This works great for our small room, but we wanted something altogether more impressive — and more importantly, useful — for the Xbox launch.

At Last.HQ we’re big fans of impressive launches. Not a week goes by without us watching some kind of launch, be it the Large Hadron Collider, or one of the numerous NASA space launches.

We put a plan into action late on Monday evening (the night before launch), and it quickly turned into a “How many monitors can you fit into a room” game. In the end though, being able to see as many metrics as possible became useful.

So, ladies and gentlemen…

Welcome to the war room

Every spare 24” monitor in the office, two projectors, a few PCs and an awesome projector clock for a true “war room” style display (and to indicate food time).

Put it together and this is what you get:


Coupled with a quickly thrown together Last.fm style Nasa logo (courtesy our favourite designer), we were done. And this is where we spent 22 hours on the day of the launch, staring at the graphs, maps, alerts, twitter feeds.. you name it, we had it.

It was pretty exciting to sit and watch the graphs climb higher and higher, and watch the twists and turns as entire areas of the world woke up, went to work, came back from work (or school) and went to sleep. We had conference calls with Microsoft to make sure everything was running smoothly and share the latest exciting stats. (Half a million new users signed up to Last.fm through their Xbox consoles in the first 24 hours!)

As well as the more conventional style graphs, we also had some fun putting together some live numbers to keep up to speed on things in a more real time fashion. This was a simple combination of a shell script full of wizardry to get the raw number, then piped through the unix tools “figlet” (which makes “bubble art” from standard text) and “cowsay” (produces an ASCII version of a cow with a speech bubble saying whatever you please).

Looking after Last.fm on a daily basis is a fun task with plenty of interesting challenges. But when you’ve spent weeks of 12-hour days and working all weekend, it really pays to sit back in a room with all your co-workers (and good friends!) and watch people enjoy it. Your feedback has been overwhelming, and where would we have been without Twitter to tell us what you thought in real time?

Coming Next Time

We had to make several architectural changes to our systems to support this launch, from improved caching layers to modifying the layout of our entire network. Watch this space soon for the story of how SSDs saved Xbox…

]]>
toby 2009-01-23T16:08:05Z 2009-01-24T10:39:28Z Last.fm on Android tag:blog.last.fm,2009-01-22:59ab5fd5ebdd7507425a613a80c0101f/e0c983d30567b0916430701808153275 For the past 6 months we’ve been on a mission to let you experience Last.fm where you want, when you want. We realize that not everyone has a web browser plugged into their home stereo and very few of us want to take our laptops on the morning jog. We’ve worked with a great group of partners to bring Last.fm to the living room and the mobile phone.

Today we’d like to add another platform to the list: Android. Android is Google’s open source mobile operating system and it’s pushing the boundaries of what you can and should expect from your mobile phone.

Our new Android app is a fully featured Last.fm radio application that leverages the open nature of the Android OS. You’ll be able to stream your favorite Last.fm stations, view your friends’ profiles and watch out for up coming events.

One Android only feature we’re pretty excited about is… background streaming! This means you can keep listening while you browse the web, buy songs from Amazon or check out maps for an event that looks interesting. We’ve been playing with the prototypes for a while and can honestly say this is a killer feature.

Keeping with the open spirit of Android, we’re also working to make sure it’s easy to scrobble music you play in other applications. We’ve been talking to Google about scrobbling the built-in media player and will be exposing our service in a way that allows other applications to scrobble songs. This is a work in progress but something that’s unique to Android that we intend to fully embrace.

Finally, I think it’s worth mentioning the amazing development path this project has taken. First, the timeframe for rolling this out was super tight. We started work about a month ago and feel the end product shines. Kudos to the awesome client team for the rapid turnaround. Part of the secret to success was using our open source development community. We had been contacted by a couple of open source developers who wanted to bring Last.fm to Android. Instead of having multiple projects, we all decided to work together to create one official Last.fm application. So, special thanks to Lukasz Wisniewski and Casey Link for contributing their projects and time and helping make a really exciting application.

Stay tuned for more updates as we plan to launch some exciting new mobile features soon.

Download it now from the Android Market on your mobile.

]]>
2008-07-13T20:38:12Z 2008-07-14T19:42:04Z Last.fm for iPhone and iPod Touch tag:blog.last.fm,2008-07-13:59ab5fd5ebdd7507425a613a80c0101f/db0969803ccb62fe25e3b6b922238f36 We are pleased to announce the launch of Last.fm on the iPhone and iPod Touch! Sam Steele, our iPhone development army of one, has been cranking away at a full blown Last.fm app on Apple’s mobile platforms for months now and the results are nothing short of insanely great.

Read on for details, but this video speaks for itself.


To get started, go to the music category of the iTunes App store (in iTunes or on your iPhone/Touch). Find the Last.fm app and download it (for free).

Log in or signup to Last.fm and you’ll be presented with a fairly obvious selection of Last.fm functionality. Things with the red circle icon start streaming. You can navigate through the menus and go back with the button in the upper left.

Once you start streaming something, you’ll have access to the familiar Last.fm contextual items (love, ban, skip… tagging will be in the next version). You can also check out the artist bio, similar artists and events (particularly cool). If there are current events for the now playing artists, you can specify if you’re attending or not and go to a Google map for the event location.

There’s a lot you can do in this app, but the interface is pretty slick so hopefully it will all be pretty discoverable.

There ARE a couple caveats…

First of all we are initially rolling this out in the US, UK, Canada, France, Germany and Spain. We’re looking at other locales but have to deal with licensing and a host of other issues. We assure you that we’re working on it.

Secondly, there are no background applications allowed on the iPhone/Touch. There are several implications to this, but what it mostly means is any time you click a link that loads Safari, the music will stop and you’ll have to restart the app. This means event maps, and bio links. We’re looking at alternatives, but for now that’s the breaks.

To end with a bit of icing, the app knows how to read lastfm:// links. That means if you’re browsing the Last.fm website on the iPhone and click a “play in software” link, the app will start streaming for you! It’s neat, you’ll see.

This is version 1.0 and we have some cool stuff lined up for the next revisions. Love to hear any feedback.

]]>
mattb 2008-05-31T00:47:56Z 2008-06-02T14:25:04Z Guerrilla user testing in central London tag:blog.last.fm,2008-05-30:59ab5fd5ebdd7507425a613a80c0101f/a15c347b50398e5cd748806f84d85c23

Our new baby, beta.last.fm, has been out of the office incubator for about a week now, and as we feed and water her, we’re keeping a careful eye on how she’s been getting on in the subscriber enclosure before we release her into the wild.

First up, MASSIVE thanks and ‘nuff respect (as the kids say here in London town) to everyone for their feedback, suggestions and ideas so far.

We’re always experimenting with loads of ways to help make the Last.fm experience more and more awesome: in-page feedback and commenting, the Last.fm Beta Group, Get Satisfaction, chatting to our mums, impassioned debate over ping pong or in the ball pool; the list goes on. One of the most fun ways, though, is getting out there on the street, face-to-face with people, chatting and finding out how we can make stuff better. So, yesterday, I strode into central London with a laptop, some screengrab software and the promise of free coffee and cake.

Grabbing a seat at the nearest café with wifi, I arranged to meet a few people in the area (long-time users who’ve been with us for years; new users still discovering what we do; friends and relatives; random people off the street; anyone with a spare twenty minutes, really) to show them beta.last.fm and watch them having a play with it. Loose, informal user testing — or, to use its technical term, ‘chatting to and watching people try out our new ideas over some free coffee and cake’ — is fascinating, great fun to do, and, combined with our other feedback-recording methods, as I believe Mr. Matthew Ogle, Esq. will discuss, reveals fantastically rich layers of information that really help us improve the Last.fm experience.

Right now, back at HQ, we’re working flat out (though, at the time of writing, it is Friday, so we’ll be having a few down the Arthur too), mashing all this feedback and observation together to help us tweak, polish and rethink our ideas and plans as we move forward to a public release of beta.last.fm as soon as possible.

Once again, thanks, and big up to everyone for the feedback so far. We’re listening to everything, and working directly with your help, so keep keep keep it coming.

PS fidothe, alexmuller, molluskii, camilondon, brooner, and clacaby – pleasure to chat to you today.

]]>
Toby 2008-05-27T14:55:38Z 2008-05-27T15:04:23Z Import Loved Tracks Into Facebook tag:blog.last.fm,2008-05-22:59ab5fd5ebdd7507425a613a80c0101f/2c5ebacd070f4bc16ed8c62a2d0bada6 Last.fm and Facebook have teamed up to give you a super easy way to get your Last.fm loved tracks into your Facebook feeds. Starting today, you can click “Import” on your Facebook Mini-Feed (the one on your FB profile page) and enter your Last.fm username, then… actually that’s all you have to do :) From that point on, all tracks that you love on Last.fm or in the Last.fm client software will show up in your Facebook feeds.

We’re looking at eventually exposing more Last.fm actions into the feed, but thought this was a great way to start. See below for screenshot goodness.


Enter your user name


Facebook finds your account


Loved tracks show up in your feed

]]>
flaneur 2007-12-24T18:06:11Z 2007-12-24T18:34:20Z How to make your parents dance tag:blog.last.fm,2007-12-24:59ab5fd5ebdd7507425a613a80c0101f/3c5f9bfb2764a27ee913c82eda6701fe Like many others at Last.fm, I’ve left the warm, ball-filled embrace of Last.HQ in London and headed home to my family for the holidays.

Since arriving in my arctic homeland, I’ve been wondering if there was a way to shake up the old routine of tired holiday carols, marathon dinners, moose racing, and rambling uncles; a way to bring a bit of the ol’ Last.fm magic home. (Christmas tag radio notwithstanding.) And that’s when I hit upon THE ULTIMATE PLAN. Better yet, you can reproduce this party in the comfort of your own home!

What You’ll Need

  • An internet connection
  • A computer that can be plugged into a large set of speakers
  • A house full of relatives (including but not limited to parents, sisters, second cousins, and loud uncles) who secretly want to party

What To Do

  1. Wait until dinner has ended and holiday drink consumption is in full effect
  2. Go to the room with the speakers and clear away any rugs, Christmas trees, babies, lebkuchen, or anything else which might impede dancing madness
  3. Load this page to queue up an hour and a half of the finest old-school rock and roll, direct from our recent party in London
  4. HIT PLAY AND TURN IT UP!

It can’t fail, especially if you have relatives that grew up in the 1950s. Happy holidays everyone…

]]>
tony 2007-08-30T23:12:37Z 2007-09-01T10:51:06Z Squid Optimization Guide tag:blog.last.fm,2007-08-31:59ab5fd5ebdd7507425a613a80c0101f/11f3aa449da772b77cb6eee74456f72d Squid, is a caching web proxy, and is one of the great many back-end applications that we in the Systems department of Last.FM use to make your experience of the site that little bit smoother. We have Squid deployed as a reverse caching proxy.

This worked fine for a while, but over the past few days (as some of you have probably noticed and mentioned on the forums), it began to slow down. I set to work a couple of days ago debugging the speed decrease that had suddenly afflicted our squid cluster. Unfortunately, Squid is probably one of the least documented applications out there – the documentation that exists is vague, and doesn’t go into much detail; it would also seem that everyone else who’s set up squid either hasn’t dealt with the amount of traffic we do, or just hasn’t posted online about how they dealt with these issues when they cropped up.

In debugging squid, there is approximately a 24 hour period after a modification before you really see whether what you have changed has fixed the problem. This is compounded if you add file-system benchmarking into the mix – the cache must refill before you get a decent picture of what is happening.
Over the past few days, I’ve tried many squid configuration options, the majority of which are anecdotally documented, so it really felt like a stab in the dark a lot of times. Tonight, however, I struck gold, and I feel that I should share the wealth regarding optimizing squid for a high-throughput setup such as the one we employ here.

Playing the Optimization Game

Probably the most important thing to note when deploying squid, is that in 99% of cases, you will have many thousands – if not millions – of very small files; due to this, you need to choose a file-system that is able to deal very well with reading/writing many small files concurrently.

Enter ReiserFS

Having tried both XFS – very poor performance over time -, and ext3 – better performance, but still lags a lot under load -, I switched over to ReiserFS, and have found that this lives up very well to its reputation of being good with many-small-files and many-reads/writes-per/sec.

I highly recommend that your machine is set up with a separate pair of squid disks, or worst case, on a separate partition on the host OS drives, utilizing a decently fast RAID level (think RAID10 here, don’t bother going near RAID5, you’ll get major I/O lag on writes). I’d recommend going for FAST disks (stay away from IDE here, or you’ll be in a world of pain).

On Debian, you should have ReiserFS support already, on CentOS, you’ll need to enable the centosplus repo by setting enable=1 in /etc/yum.repos.d/CentOS-Base.repo (on, or around line 59), then yum install reiserfs-utils.

Then it’s a case of

mkfs.reiserfs /dev/sdXX

Where XX is the partition you are going to use for squid – in our case:

mkfs.reiserfs /dev/sdb1

Then add your partition to /etc/fstab:

/dev/sdb1 /var/spool/squid reiserfs defaults,notail,noatime 1 2

Note the notail,noatime – these are both important, and will give you a performance boost. For more details about ReiserFS mount options, see here

No! No! No! Compile from source!!

I’m not usually a great fan of compiling from source when it comes to multi-system implementations; they make life hard when it comes to system administration, and to be honest, I’m a big fan-boy of packages for ease-of-use, and lack of headaches they cause. I’ll be making a package for our particular squid setup tomorrow, but this optimization how-to wouldn’t benefit from a ‘now simply install a package’, would it? =)

We’re using Squid-2.6STABLE14 here – it’s the latest current release from the STABLE branch. I took a look at the Squid-3.0 release a while ago, and found a lot of bugs (after all, it is in beta), so I’m sticking with 2.6 for now. You can find a full list of versions available here, but I warn you that this how-to is probably only good for 2.6, so YMMV if you choose another version.

Grab the source and extract it. You’ll need the relevant development binaries installed – gcc, g++, etc.
The following CHOST and CFLAGS will vary based on your processor and platform. The ones you will need to change are -march= and of course, if you’re on a 32bit platform, use CHOST="i686-pc-linux-gnu".

I find the Gentoo-Wiki Safe CFLAGS page to be an excellent reference for quickly finding which -march= definition to use based off processor type.

In our case, we’re running 64bit Core2Duo chips, so compile with the following options

CHOST="x86_64-pc-linux-gnu" \
CFLAGS="-DNUMTHREADS=60 \
-march=nocona \
-O3 \
-pipe \
-fomit-frame-pointer \
-funroll-loops \
-ffast-math \
-fno-exceptions" \
./configure \
--prefix=/usr \
--enable-async-io \
--enable-icmp \
--enable-useragent-log \
--enable-snmp \
--enable-cache-digests \
--enable-follow-x-forwarded-for \
--enable-storeio="aufs" \
--enable-removal-policies="heap,lru" \
--with-maxfd=16384 \
--enable-poll \
--disable-ident-lookups \
--enable-truncate \
--exec-prefix=/usr \
--bindir=/usr/sbin \
--libexecdir=/usr/lib/squid

Note the -DNUMTHREADS=60; this is probably an under-estimate for our setup, as you can easily run with 30 on a 500mhz machine. This CFLAG controls the number of threads squid is able to run when using asynchronous I/O. I’ve been quite conservative with this value, as I don’t want Squid to block, or utilize too much CPU. The rest of the CFLAGS heavily optimize the outputted binaries.

I recommend building with the ./configure line as above, obviously, if you change it, YMMV!

Here’s a rundown of what those options do:

--enable-async-io: enables asynchronous I/O – this is really important, as it stops squid from blocking on disk reads/writes

--enable-icmp: optional, squid uses this to determine the closest cache-peer, and then utilizes the most responsive one based off the ping time. Disable this if you don’t have cache peers.

--enable-useragent-log: causes squid to print the useragent in log entries – useful when you’re using lynx to debug squid speed.

--enable-snmp: We graph all of our squid boxes utilizing cacti, you’ll want this enabled if you want to proxy SNMP requests to squid and graph the output.

--enable-cache-digests: required if you want to use cache peering

--enable-follow-x-forwarded-for: We have multi-level proxying happening as packets come through to squid, so to stop squid from seeing every request as from the load balancers, we enable this so squid reads the X-Forwarded-For header and picks up the real IP of the client that’s making the request.

--enable-storeio="aufs": YMMV if you utilizing an alternate storage i/o method. AUFS is Asynchronous, and has significant performance gains over UFS or diskd.

--enable-removal-policies="heap,lru": heap removal policies outperform the LRU policy, and we personally utilize “heap LFUDA”, if you want to use LRU, YMMV.

--with-maxfd=16384: File Descriptors can play hell with squid, I’ve set this high to stop squid from either being killed or blocking when it’s under load. The default squid maxfd is (i believe), 4096, and I’ve seen squid hit this numerous times.

--enable-poll: Enables poll() over select(), as this increases performance.

--disable-ident-lookups: Stops squid from performing an ident looking for every connection, this also removes a possible DoS vulnerability, whereby a malicious user could take down your squid server by opening thousands of connections.

--enable-truncate: Forces squid to use truncate() instead of unlink() when removing cache files. The squid docs claim that this can cause problems when used with async I/O, but so far I haven’t seen this be the case. A side effect of this is that squid will utilizing more inodes on disk.

Go! Go! Gadget Makefile

After your ./configure has finished running, and if there aren’t any errors, it’s time to make. This will take some time, depending on the spec of your machine, but once it’s finished (without errors), you’ll want to make install.

This bit is optional, but doesn’t hurt:

strip /usr/sbin/squid /usr/lib/squid/*

This will remove the symbols from the squid binaries, and give them a slightly smaller memory footprint.

/etc/squid.conf

Now, lets move on to getting the squid.conf options right…

I’m not going to go into every config option here, if you don’t understand one, I recommend you check out the Configuration Manual, which contains pretty much every option and a description of how to use it.

This would be my recommended squid.conf contents:

NOTE! I’ve stripped out superfluous (obvious) configuration options that are required, such as http_port IP:PORT type, as they are out-side the scope of this blog entry.


hosts_file /etc/hosts
dns_nameservers x.x.x.x x.x.x.x
cache_replacement_policy heap LFUDA
cache_swap_low 90
cache_swap_high 95
maximum_object_size_in_memory 50 KB
cache_dir aufs /var/spool/squid 40000 16 256
cache_mem 100 MB
logfile_rotate 10
memory_pools off
maximum_object_size 50 MB
quick_abort_min 0 KB
quick_abort_max 0 KB
log_icp_queries off
client_db off
buffered_logs on
half_closed_clients off

Okay, so what does all that do?

hosts_file /etc/hosts: Forces squid to look in /etc/hosts for any hosts file entries; don’t ask me why, but it isn’t good at figuring out that this is the default place on every Linux distribution.

dns_nameservers x.x.x.x x.x.x.x: Important! Squid will stall connections while attempting to do DNS lookups, somehow, specifying DNS name-servers within the squid.conf stops this from happening (and yes, they must be valid name-servers).

cache_replacement_policy heap LFUDA: You may not want to use the LFUDA replacement policy. If not, I recommend you stick with a variant on heap, as there are massive performance gains over LRU. Details of the other policies are here

cache_swap_low 90: Low water mark before squid starts purging stuff from its cache – this is in percent. If you have a 10gb cache storage limit, squid will begin to prune at 9gb used.

cache_swap_high 95: The high water mark. Squid will aggressively prune old cache files utilizing the replacement policy defined above. This would take place at 9.5gb in our above example. If you have a huge cache, it’s worth noting that your percentages would be better served closer together. i.e. a 100gb cage is 90gb/95gb – 5 gb difference. In this case, it would be better to have a 94%/95% watermark setup.

maximum_object_size_in_memory 50 KB: Unless you want to serve larger files super fast from memory, I recommend keeping this low – mainly to keep memory usage under control. Large files monopolizing vital RAM, while giving you a better byte hit-rate, will sacrifice your request hit-rate, as smaller files will keep getting swapped in and out.

cache_dir aufs /var/spool/squid X X X: I highly recommend NOT changing from AUFS. All the other storage methods in my benchmarking have been a lot slower performance wise. Obviously, replace the 3 X’s here with your storage limits.

cache_mem 100 MB: Keep this set low-ish. This represents the maximum amount of ram that squid will utilize to keep cached objects in memory. Remember, squid requires about 100mb of ram per GB of cache storage. If you have a 10gb cache, squid will use ~1gb just to handle that. Make sure that cache_mem + (storage size limit * 100mb ) is less than your available ram, or your squid will start to swap.

memory_pools off: This stops squid from holding onto ram that it is no longer actively using.

maximum_object_size 50 MB: Tweak this to suite the approximate maximum object size you’re going to serve from cache. I’d recommend not putting this up too high though. Better to cache many small files, than one very large file that only 4 people have downloaded.

quick_abort_min 0 KB: This feature is useful, in some cases, but not in an optimized squid case. What quick_abort does in laymans terms, is evaluates how much data is left to be transferred if a client cancels a transfer. If that amount is within the quick_abort range, squid will continue downloading the file and then swap it out to cache. Sounds good, right? Hell no. If a client makes multiple requests, you can end up with squid finishing off multiple fetches for the same file. This bogs everything down, and causes your squid to be slow. 0 KB disables this feature.

quick_abort_max 0 KB: See quick_abort_min

log_icp_queries off: If you’re using cache_peers, you probably don’t need to know every time squid goes and talks to one of its peer-caches. This is needless logging in most cases, and is just an extra I/O thread that could be used elsewhere.

client_db off: If enabled, squid will keep statistics on each client. This can become a memory hog after a while, so it’s best to keep it disabled.

buffered_logs on: Buffers the write-out to log files. This can increase performance slightly. YMMV.

half_closed_clients off: Sends a connection-close to clients that leave a half open connection to the squid server.

Tweak my /proc baby, yeah!

Okay, so Squid is optimized; what about the TCP stack? By default, a pristine installation is ‘optimized’ for any-use. By that, I mean it has a set of default kernel-level configuration settings that really don’t play ball well with network/disk intensive applications. We need to make a few modifications.

First thing, is to ‘modprobe ip_conntrack’, and add this module to either /etc/modules (debian) or /etc/modprobe.conf (RHEL/CentOS).
This will stop squid from spitting out the terribly useful message

parseHttpRequest: NF getsockopt(SO_ORIGINAL_DST) failed: (92) Protocol not available

With that done, lets make some sysctl modifications…

Add the following lines to the end of your /etc/sysctl.conf


fs.file-max = 65535
net.core.rmem_default = 262144
net.core.rmem_max = 262144
net.core.wmem_default = 262144
net.core.wmem_max = 262144
net.ipv4.tcp_rmem = 4096 87380 8388608
net.ipv4.tcp_wmem = 4096 65536 8388608
net.ipv4.tcp_mem = 4096 4096 4096
net.ipv4.tcp_low_latency = 1
net.core.netdev_max_backlog = 4000
net.ipv4.ip_local_port_range = 1024 65000
net.ipv4.tcp_max_syn_backlog = 16384

I’ll let you google for the meaning of those changes, they’re documented almost everywhere; I’m merely telling you which one’s are worth changing.
Note that with the file-max entry, you’ll also want to modify /etc/security/limits.conf and add:

* - nofile 65535

With that done, your best bet is to reboot, and let the box pick up the changes that way. I’ve had some funky issues with squid + file-descriptor changes on the fly.

When the box is back up, start up squid, and have fun. You’re optimized. =)

]]>
Speed is the name of the game these days, and if you’re running Squid, it needs to serve its cache fast, every time. This guide shows you how to get from slow Squid to Optimized Squid in 30 minutes.

]]>